Dummy Client の設定 (Raspberry Pi の場合)
Lab2 で Cloud9 を選択した場合は 3-2-a を、Raspberry Pi を選択した場合は 3-2-b を実施してください。
3.2.1 証明書ファイルのアップロード
ターミナルもしくは Tera Term から先程ダウンロードした証明書を Raspberry Pi に転送します
Windows の場合
先程ダウンロードした対象の証明書を Tera Term にドラッグ&ドロップします。
**-certificate.pem.crt**-private.pem.key
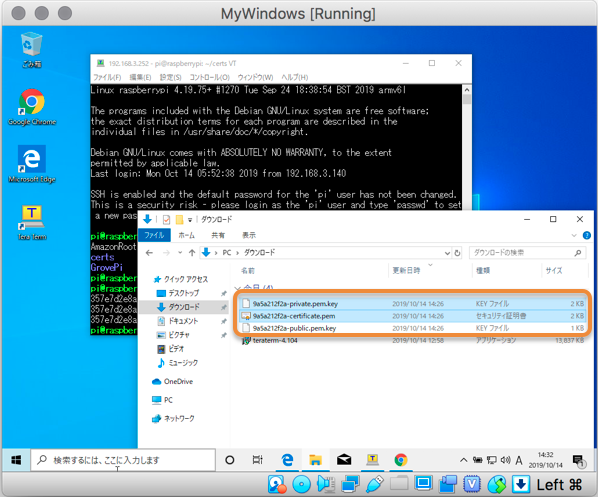
- 送信先に
./dummy_client/certs/と入力する - 同じ処理を次の1個のファイルに適用(D)にチェックを入れてOKを押下
MacOS の場合
以下のコマンドの ~/Downloads/** の部分と <IPアドレス> をご自身のファイル名、Raspberry Pi のIPアドレスに修正して、コマンドを実行します。
scp ~/Downloads/**-private.pem.key ~/Downloads/**-certificate.pem.crt pi@<IPアドレス>:./dummy_client/certs/3.2.2 Device SDKを使ったdummy clientの設定
ターミナルもしくはTera TermからRaspberry Piへ接続した状態で、以下のコマンドを実行していきます。
以下のコマンドを実行し、AWS IoT のルートCA証明書をダウンロードします。
cd ~/dummy_client/certs/
wget https://www.amazontrust.com/repository/AmazonRootCA1.pem -O AmazonRootCA1.pem
以下のコマンドを実行し、dummy client を起動します。
- コマンドのうち
{ご自分の作ったモノ名}と{AWS IoTのendpoint_url}は事前にメモした内容に置き換えます- 例:
python3 device_main.py --device_name tanaka-20200723 --endpoint xxxxx-ats.iot.ap-northeast-1.amazonaws.com
- 例:
cd ~/dummy_client/
python3 device_main.py --device_name {ご自分の作ったモノ名} --endpoint {AWS IoTのendpoint_url}
上記コマンドを実行すると、 dummy client は AWS IoT Core へ MQTT で接続し、5秒おき(デフォルト設定の場合)にメッセージを送信します。
- 上記コマンド実行後、以下のような結果が返ってきます。この一番下の
topicをメモしておいてください。(以下の例ではdata/tanaka-20200723です)
device_name: tanaka-20200723
endpoint: random-ats.iot.ap-northeast-1.amazonaws.com
rootca cert: ./certs/AmazonRootCA1.pem
private key: ./certs/random-private.pem.key
certificate: ./certs/random-certificate.pem.crt
Check latest Shadow status
Subscribing to Shadow Delta events...
Subscribing to Shadow Update responses...
Finished getting initial shadow state.
un subscribe from get shadow events
topic: data/tanaka-20200723
モノの名前や AWS IoT のエンドポイント URL は AWS CLI などを用いて取得することも可能です。
- 登録済みのモノの一覧の取得:
aws iot list-things - AWS IoT のエンドポイント URL の取得:
aws iot describe-endpoint --endpoint-type iot:Data-ATS
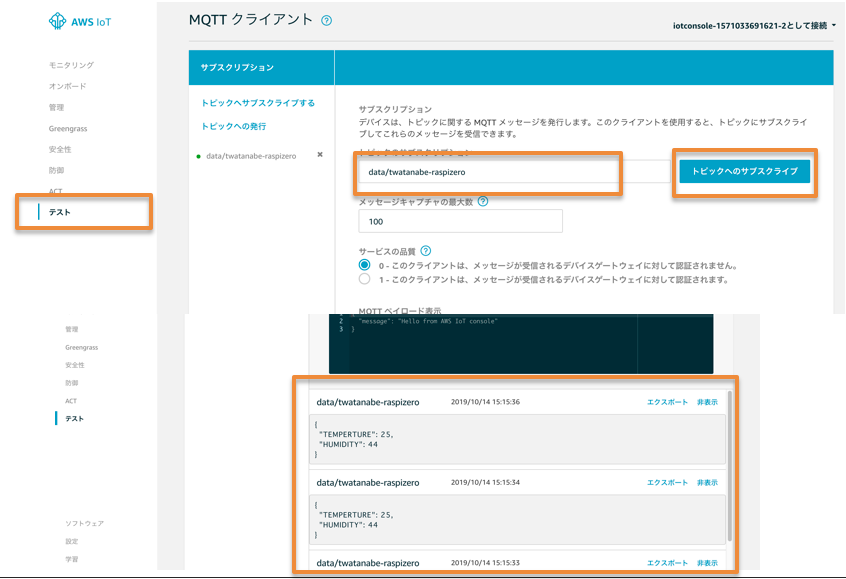
3.2.3 疎通テスト
AWS IoT画面の左メニューから テスト を選択し 先程メモしたtopic名を入力して、トピックへのサブスクライブをすると送信されたデータが確認できます。